
Introduction
python socket chat – In the world of networking and communication, socket programming acts as a foundation that allows data exchange between different computers over a network.
Python has a nice socket module that is able to easily provide all of the necessary tools in order to build any networked application and is real-time chat system compatible based on sockets.
Client-server communication is a key aspect of computer networking, allowing interaction to occur between two separate units: the client and server.
The client raises requests, normally in the form of data queries or commands, and the server listens to these requests, processes them, and sends back an appropriate response. It supports abstractions for distributed computing on top of a cluster manager like Spark.

In this tutorial, we are going to implement the basic idea of a chat application, as clients can connect to a server and have their messages exchanged.
This is just a basic understanding of socket-based communication (a little bit more than the Hello World program), which consists of a server and multiple clients—providing connection establishment in between all incoming connections to be terminated that can send some messages up meeting with the stability condition being transferred back.
Getting Started
The socket module in Python is needed to create a client-server chat application. It provides network-based facilities to the developers where they can create sophisticated programs.
This module allows developers to generate and receive data over sockets with protocols such as TCP/IP in a more convenient way, providing reliable bidirectional transmission so that responsive communication can be achieved for applications.
To scale up further, we will use Python’s threading module. Using these, the server can handle several client connections at the same time, so it is capable of handling demands efficiently and without allowing one connection being handled to block another.
This concurrency feature is critical for high-scale interactive applications that must accept many clients at the same time.
Server Socket
In this section we will create a socket server, and now let’s create server.py in the project directory to create a server socket using functionalities provided by the socket and threading libraries.
import socket
import threading
We must first import the socket module in order to perform our networking operations. It introduces a network socket to make a connection and transmit the data via TCP/IP.
Besides, import threading is used to include Python’s utility for concurrent programming. The server can work with multiple user connections at the same time because it creates individual threads for each client; this is called threading.
So now we have the import statements, and it is time to write a Python function that starts an application server, which can wait for incoming client requests on a certain host address.
def start_server():
    host = '127.0.0.1'  # localhost
    port = 12345

    server = socket.socket(socket.AF_INET, socket.SOCK_STREAM)
    server.bind((host, port))
    server.listen(5)
    print(f"[LISTENING] Server is listening on {host}:{port}")

    while True:
        client_socket, addr = server.accept()
        client_handler = threading.Thread(target=handle_client, args=(client_socket, addr))
        client_handler.start()
The start_server() function initiates a service that will accept client connections. The first thing it does is declare the server host address (127.0.0.1) and port number, which in this case we simply used 12345. These parameters tell the server which clients to allow or not and where these connections may come from.
The next thing that we do is create a socket with the help of socket.socket(socket.AF_INET, socket.SOCK_STREAM). This socket is set to work with the IPv4 (socket.AF_INET) and TCP protocol (socket.SOCK_STREAM).
The server.bind((host, port))—This method binds the socket to host and port. This is the most important step, as this resolves to binding our socket on top of the server address and enables it to listen for incoming client connections at a given port.
Note: After binding the socket, server.listen(5) call sets the socket to listen for incoming connections. The 5 is a constant that denotes the maximum number of queued connections (backlog) that server will handle at any point in time.
Once the server is set up and listening, the function gets into an infinite loop, which is waiting until a client wants to make a connection using the server.accept().
To process multiple clients at the same time, this function creates a new thread for each incoming connection. This thread will run the handle_client() function with client_socket and addr as arguments.
Let’s now work on constructing our second function, handle_client().
def handle_client(client_socket, addr):
    print(f"[NEW CONNECTION] {addr} connected.")

    while True:
        # Receive message from client
        msg = client_socket.recv(1024).decode('utf-8')
        if not msg:
            break

        print(f"Client Message Received: {msg}")

        msg = input("Send Message: ")

        # Echo message back to client
        client_socket.send(msg.encode('utf-8'))

    print(f"[DISCONNECTED] {addr}")
    client_socket.close()
The handle_client() function controls the server-side communication with a single connected client. It starts by printing to the console that a new connection has been detected ([NEW CONNECTION]) and will print address of the client, which is only used to confirm that its client is successfully connected.
The program listens for messages from clients that receive a continuous loop using client_socket.recv(1024) receives 1024 bytes of data and encodes them from UTF-8 encoding to a string readable.
The function then prompts the server operator to input a response message. Once the server operator enters a message(msg), it is sent back as a message to the client.
Finally, let’s create a main block that acts as an entry point when executing the script directly.
if __name__ == "__main__":
    start_server()
excellent! Now that we’ve created our socket server, it’s time to configure the client socket. Before we dive into the client code, let’s create a client.py file in our project directory. We will start by importing the socket module into our code.
Client Socket
import socketAfter importing the socket module, let’s create our initial client function, start_client().
def start_client():
    host = '127.0.0.1'  # localhost
    port = 12345

    client = socket.socket(socket.AF_INET, socket.SOCK_STREAM)
    client.connect((host, port))
    print("[CONNECTED] Connected to server.")

    while True:
        # Send message to server
        msg = input("Send Message: ")
        client.send(msg.encode('utf-8'))

        # Receive echoed message from server
        recv_msg = client.recv(1024).decode('utf-8')
        print(f"Server Message Received: {recv_msg}")

    client.close()
The start_client() function begins by defining the server’s host address (127.0.0.1) and port number (12345) as the first action that occurs specifies where the client should connect to in order to establish communication with the server.
After creating the socket, client.connect((host, port)) connects to a server at a specific host / port.
The while loop will ask the user for a message to be sent to the server. It then transmits it in bytes.
Next, this function calls client.recv(1024), waiting for a reply from the server, which is capable of receiving 1024 bytes at most. This data is received in bytes and decoded using decode('utf-8’) to give us our readable string stored within recv_msg.
In conclusion, we need to build a main section that works as an entry point whenever one runs the script directly on their computer.
if __name__ == "__main__":
    start_client()
Executing the Scripts
After finishing with the configuration of the client socket, let us go ahead and execute both programs (server.py and client.py). So run the server first, then start the client and check the outputs that are shown.
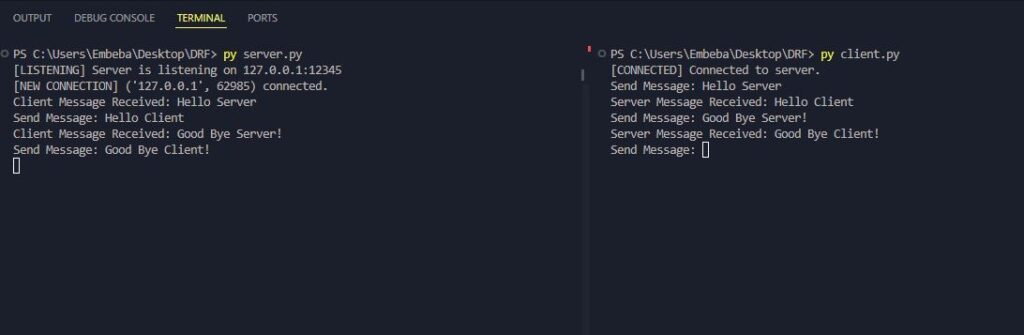
As illustrated by the above image, when the client successfully connected to the server at its designated address, a chat session ensued.
🧷Explore the complete source code on GitHub.